


🗂 NSServices Property 구조


→ property list key NSKeyEquivalent
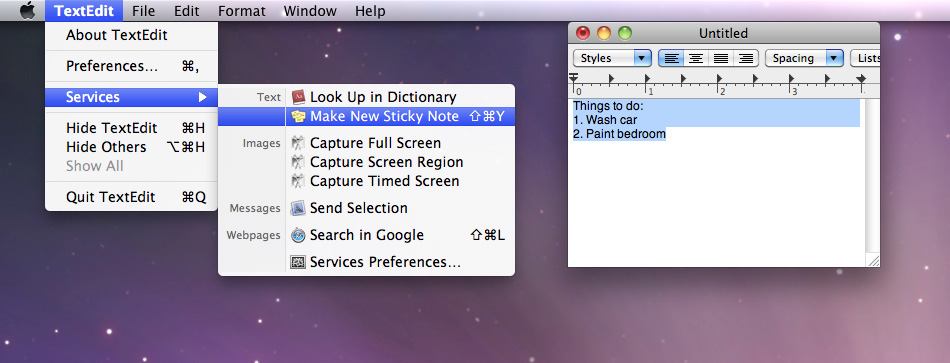
- A keyboard shortcut that invokes the service menu command.
- 서비스 메뉴 단축키 설정 입력 항목 [key equivalent]
→ property list key NSMenuItem [Required]
- Text for a Services menu item.
- 서비스 메뉴의 타이틀 입력 항목 [Menu]
→ property list key NSMessage [Required]
- An instance method that invokes the service.
- 서비스와 관련 된 인스턴스 메서드명 입력 항목 [Instance method name]
→ property list key NSPortName
- The port that the service monitors for incoming requests.
- 서비스 요청을 처리 할 애플리케이션 명칭 입력 항목 [Incoming service port name]
→ property list key NSReturnTypes
- The data types that the service returns.
- 서비스 수행 시 반환이 되는 데이터 타입 입력 항목 [Return Types]
→ property list key NSSendTypes
- The data types that the service can read.
- 서비스 수행에 필요한 값에 대한 데이터 타입 입력 항목 [Send Types]
→ property list key NSTimeout
- The amount of time, in milliseconds, that the system waits for a response from the service.
- 서비스 요청으로부터 시스템 응답 대기 시간을 milliseconds 단위의 시간 입력 항목 [Timeout value (in milliseconds)]
→ property list key NSUserData
- A service-specific string value.
- 서비스 String 값 입력 항목 [User Data]
🗂 NSServices 개발 방법 및 소스코드
[영문]
- Deciding what the service will do
- Implementing the service method
- Registering the service provider
- Advertising the service by adding it to your application’s property list file
- Installing the service
[국문]
- 서비스가 수행 할 작업을 결정합니다.
- 서비스 메서드를 통하여 작업을 수행합니다.
- 서비스 프로바이더에 등록합니다.
- 애플리케이션 info.plist 파일에 의해서 추가 된 서비스에 통지합니다.
- 서비스를 수행합니다.
📔 AppDelegate Source Code by Swift
@NSApplicationMain
class AppDelegate: NSObject, NSApplicationDelegate {

    func applicationDidFinishLaunching(_ aNotification: Notification) {
        // Insert code here to initialize your application

        /// NSRegisterServicesProvider(CustomServiceProvider(), "CustomServiceProvider")
        NSRegisterServicesProvider(SERVICE_METHOD_CLASS, PROVIDER_NAME)

        /// Causes the services information for the system to be updated.
        NSUpdateDynamicServices()
    }
}
📔 ServiceProvider Source Code by Swift
class CustomServiceProvider: NSObject {
    @objc func service(_ pasteboard: NSPasteboard, userData: String?, error: AutoreleasingUnsafeMutablePointer<NSString>) {
    }
}
🗂 NSServices 주요 메서드 및 System Program
→ NSServices Services Functions
- NSUpdateDynamicServices() [Required]
- Causes the services information for the system to be updated.
- OSX System에서 사용자가 서비스를 요청하였을 경우 관련 된 정보를 업데이트하는 함수입니다.
- NSRegisterServicesProvider(_:_:)
- Registers a service provider.
- OSX System 서비스를 프로바이더에 등록하는 함수입니다.
- NSUnregisterServicesProvider(_:)
- Unregisters a service provider.
- OSX System 서비스를 프로바이더에 해제하는 함수입니다.
→ NSServices pbs Update Method
system("killall pbs;/System/Library/CoreServices/pbs -flush");→ NSService Debug with Terminnal
/System/Library/CoreServices/pbs -dump_pboard

[RESULT]----------------------------->
(
        {
        NSBundleIdentifier = "com.ChangYeop.Dev.NSServiceDemo";
        NSBundlePath = "/Users/yangchang-yeob/Library/Developer/Xcode/DerivedData/NSServiceDemo-ajybqnzdwptpceeddodjdmstwqll/Build/Products/Debug/NSServiceDemo.app";
        NSKeyEquivalent =         {
            default = T;
        };
        NSMenuItem =         {
            default = "Show Alert with NSServiceDemo";
        };
        NSMessage = service;
        NSPortName = NSServiceDemo;
        NSRequiredContext =         {
        };
        NSSendTypes =         (
            NSStringPboardType
        );
        NSUUID = {length = 20, bytes = 0xcf5be69bcc00371f65a1b89e57e5afd47452ae59};
}
🗂 NSServices 개발 시 주의 사항
[영문]
The Services feature was updated in OS X version 10.6 with the following changes and additions to properties:
- A slash is no longer treated as specifying a submenu with NSMenuItem.
- NSSendTypes and NSReturnTypes no longer need to be specified.
- There are three new properties: NSSendFileTypes, NSServiceDescription, and NSRequiredContext.
[국문]
OSX 10.6 스노우 레오파드 (Snow Leopard)에서 Services 몆 가지의 프로퍼티의 추가 및 변화가 업데이트되었으며 그 내용은 아래와 같습니다.
- NSMenuItem 사용하여 하위 메뉴를 구분하기 위해서 더이상 '/' 구문은 필요하지 않습니다.
- NSSendTypes 및 NSReturnTypes 더 이상 필수적으로 추가하지 않아도 됩니다.
- NSSendFileTypes, NSServiceDescription, NSRequiredContext 등의 세가지 새로운 프로퍼티가 추가되었습니다.
[영문]
You also need to add the NSRequiredContext key to your service to get it to be enabled by default on Snow Leopard and later.
[국문]
OSX 10.6 스노우 레오파드 (Snow Leopard) 이상 버전에서부터 Info.plist Service 항목에서 반드시 NSRequiredContext아이템 항목을 추가하여야 합니다.
[국문]
해당 기능을 사용하기 위해서는 Cocoa Application Sandbox 기능을 해제하여야 합니다.
🚀 REFERENCE
Services Properties
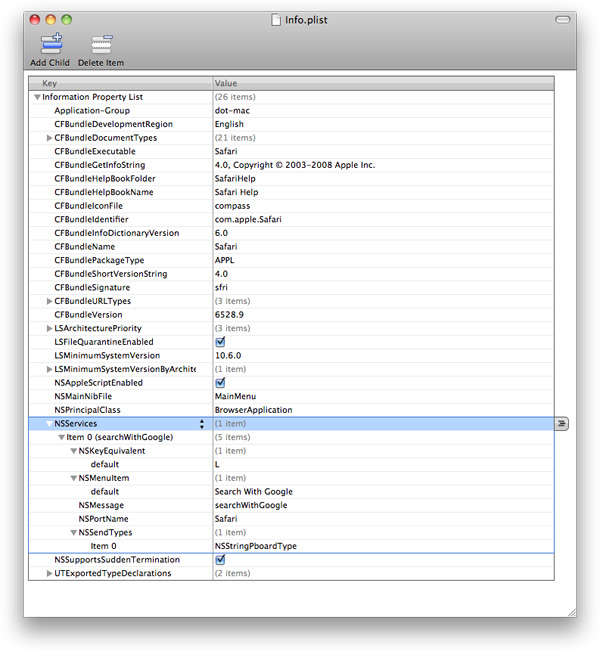
Services Properties Any application that has one or more services to provide must advertise the type of data its services can handle. Services are advertised through the NSServices property of the application’s information property list (Info.plist) file.
developer.apple.com
Providing Services On macOS
Make your app run as a background service
medium.com
Cocoa Tricks: How to add your app to the Finder's context menu - Alexander Yolkin | Cocoa and Cocoa Touch with Love
If you don’t want to read Apple’s Service Implementation Guide or you just don’t have enough time, I’ll provide 3 simple steps to add your app to the Finder’s context menu as service. Ok, Let’s do it. How to add your app to the Finder’s context menu as ser
alexanderyolkin.one
'#컴퓨터 과학 [Computer Science] > 운영체제 (Operating System)' 카테고리의 다른 글
| [OS - 🍎 macOS] ARC (Automatic Reference Counting) (0) | 2020.03.22 |
|---|---|
| [OS - 🍎 macOS] Finder Sync Extensions (0) | 2020.02.28 |
| [OS - 🍎 macOS] 파일 및 폴더 권한 (Files and Folders Permission) (0) | 2020.02.09 |
| [OS] 세마포어 (Semaphore)와 뮤텍스 (Mutex) (0) | 2020.02.05 |
| [OS - 🍎 macOS] 전체 디스크 접근 권한 (Full Disk Access) (0) | 2020.02.03 |


댓글