
🗂 CoreData
Apple Developer Documentation
developer.apple.com
🇺🇸 Overview
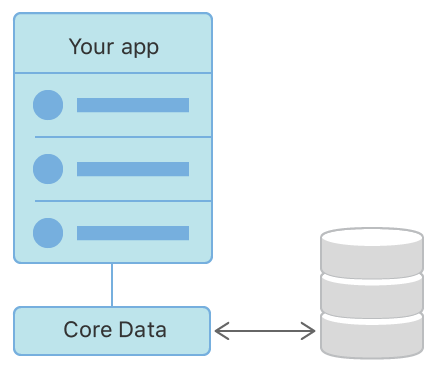
Use Core Data to save your application’s permanent data for offline use, to cache temporary data, and to add undo functionality to your app on a single device. Through Core Data’s Data Model editor, you define your data’s types and relationships, and generate respective class definitions. Core Data can then manage object instances at runtime to provide the following features.
🇰🇷 Overview
애플리케이션이 오프라인 환경에서 영구적인 데이터를 저장하기 위해 코어 데이터를 사용할 수 있습니다. 또한 디바이스에 구동되는 애플리케이션에 대한 일시적인 데이터를 캐시 작업을 수행하며 관련된 기능을 취소할 수 있습니다. 코어 데이터 데이터 모델 편집기를 통하여, 데이터 타입 그리고 관계를 정의하고 각 클래스에 대한 정의를 생성합니다. 코어 데이터는 런타임에 관련 개체 인스턴스를 관리하며 아래의 다음과 같은 기능을 제공합니다.
🇺🇸 Persistence
Core Data abstracts the details of mapping your objects to a store, making it easy to save data from Swift and Objective-C without administering a database directly.
🇰🇷 Persistence
코어데이터는 개체를 저장소에 매핑하는 세부 정보를 추상화하여 데이터베이스에 직접적으로 관리 없이 Objective-C 또는 Swift으로부터 손쉽게 데이터를 저장할 수 있습니다.

🇺🇸 Undo and Redo of Individual or Batched Changes
Core Data’s undo manager tracks changes and can roll them back individually, in groups, or all at once, making it easy to add undo and redo support to your app.
🇰🇷 Undo and Redo of Individual or Batched Changes
코어 데이터의 Undo Manager는 변경 사항을 추적하여 개별적으로, 그룹으로 또는 한 번에 모두 롤백 작업을 수행할 수 있으므로 손쉽게 애플리케이션에 대하여 실행 취소 및 다시 실행 기능을 추가할 수 있습니다.
🇺🇸 Background Data Tasks
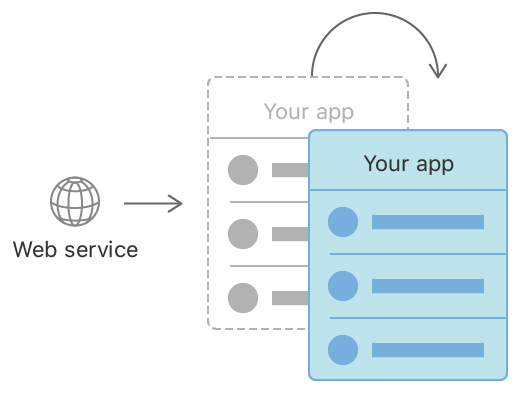
Perform potentially UI-blocking data tasks, like parsing JSON into objects, in the background. You can then cache or store the results to reduce server roundtrips.
🇰🇷 Background Data Tasks
백그라운드 상에서 객체에 대한 JSON Parsing 작업은 잠재적으로 UI-Blocking 상태에서 데이터를 처리합니다. 그런다음 결과에 대하여 캐시 또는 저장 작업을 통하여 서버에 대한 불필요한 동일 반복 작업을 줄일 수 있습니다.
🇺🇸 View Synchronization
Core Data also helps keep your views and data synchronized by providing data sources for table and collection views.
🇰🇷 View Synchronization
코어데이터는 TableView 그리고 CollectionView를 위한 Data Sources 제공하여 뷰 그리고 데이터에 동기화를 유지할 수 있도록 도와줍니다.
🇺🇸 Versioning and Migration
Core Data includes mechanisms for versioning your data model and migrating user data as your app evolves.
🇰🇷 Versioning and Migration
코어데이터는 애플리케이션이 업데이트 작업을 함에 따라 사용자 데이터를 마이그레이션 하는 메커니즘이 포함되어 있습니다.
🗂 Creating a Core Data Model
CoreData Data Model을 생성하는 방법은 아래의 Apple Developer Documentation을 참조해주시길 바랍니다. 상세하게 Data Model을 생성할 수 있도록 작성되어있습니다.
Apple Developer Documentation
developer.apple.com
Xcode 상에서 .xcdatamodeld 파일에 관련된 인터페이스 설명은 아래와 같습니다.
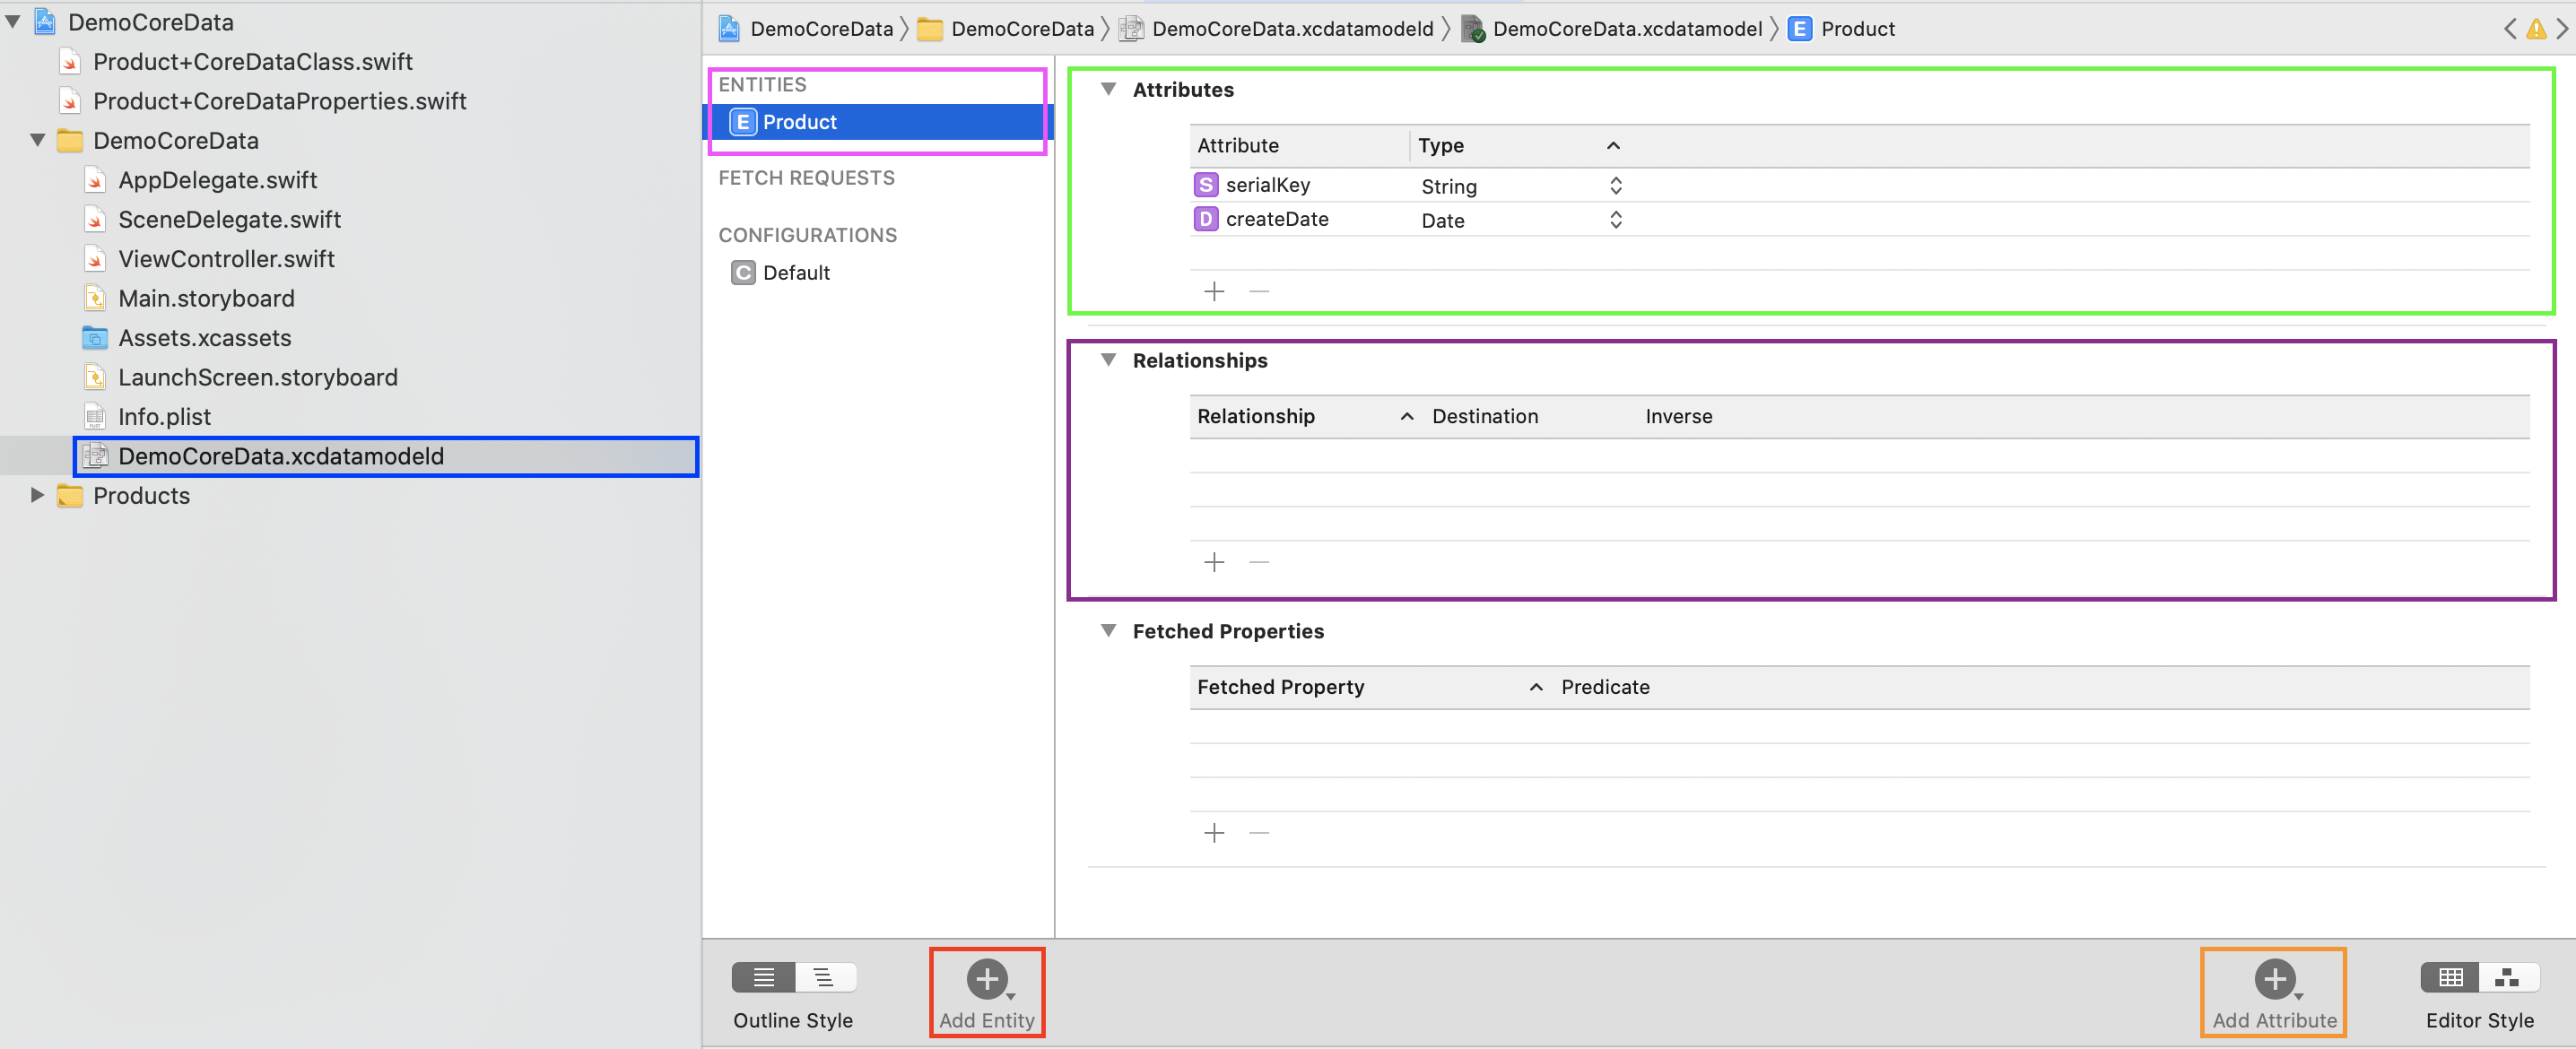
[] CoreData Entity 또는 Entity Relationship을 설정 작업을 수행하는 파일입니다.
[] CoreData Entity Object를 생성합니다.
[] 생성 된 CoreData Entity Object를 표시하는 항목입니다.
[] CoreData Entity 간에 Relationships 목록을 표시하는 항목입니다.
[] CoreData Entity Attributes 속성을 설정하는 항목입니다.
[] CoreData Entity에 Attributes를 생성합니다.
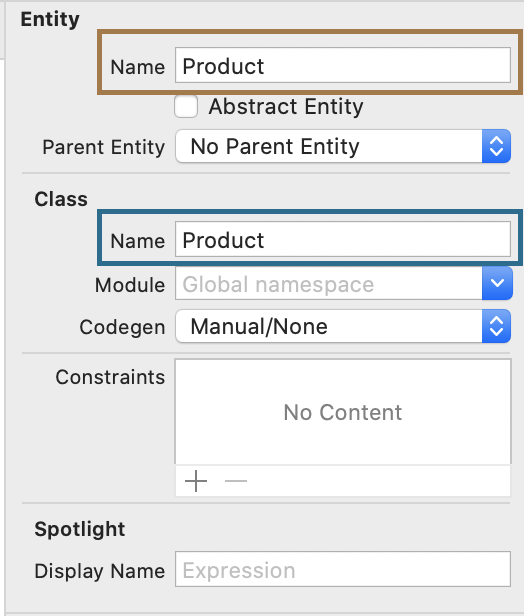

[] CoreData Entity 이름을 설정하는 항목입니다.
[] 모든 CoreData Entity 및 Relationship을 설정한 뒤 Editor → Create NSManagedObject Subclass를 통하여 자동적으로 CoreData Entity에 대한 Class 및 Properties를 생성할 수 있습니다.
🗂 CoreData Model NSAttributeType
| Attribute Type | Type | Scalar Type | Scalar by Default? |
| Integer 16 | NSNumber | Int16 | YES |
| Integer 32 | NSNumber | Int32 | YES |
| Integer 64 | NSNumber | Int64 | YES |
| Double |
NSNumber | Double | YES |
| Float |
NSNumber | Float | YES |
| Boolean |
NSNumber | Bool | YES |
| Date |
NSDate | TimeInterval | NO |
| Decimal |
NSDecimalNumber | NSDecimalNumber | NO |
| UUID |
UUID | UUID | NO |
| URI |
URL | N/A | N/A |
| String |
String | N/A | N/A |
| Binary Data |
Data | N/A | N/A |
| Transformable |
NSObject | N/A | N/A |
| Undefined |
N/A | N/A | N/A |
🗂 CoreData Relationship Types
CoreData Entity 간에 Relationship 관계는 4가지의 형태가 존재하며 세부적인 내용은 아래와 같습니다. 더 자세한 내용은 아래의 링크를 참조해주세요.
One-to-many relationships with Core Data, SwiftUI, and @FetchRequest - a free Hacking with iOS: SwiftUI Edition tutorial
Was this page useful? Let us know! 1 2 3 4 5
www.hackingwithswift.com
Relationships come in four forms:
- A one to one relationship means that one object in an entity links to exactly one object in another entity. In our example, this would mean that each type of candy has one country of origin, and each country could make only one type of candy.
- A one to many relationship means that one object in an entity links to many objects in another entity. In our example, this would mean that one type of candy could have been introduced simultaneously in many countries, but that each country still could only make one type of candy.
- A many to one relationship means that many objects in an entity link to one object in another entity. In our example, this would mean that each type of candy has one country of origin, and that each country can make many types of candy.
- A many to many relationship means that many objects in an entity link to many objects in another entity. In our example, this would mean that one type of candy had been introduced simultaneously in many countries, and each country can make many types of candy.
🗂 CoreData Persistent Store Types
CoreData에서 데이터를 저장하는 방식에는 아래의 4가지 방식이 존재하며, 각 프로젝트에 특성에 맞는 방식을 선택하여 사용합니다. 또한, 각 방식에는 원자성 (Atomic)에 대한 이해가 필요하며 아래의 링크를 통하여 세부적으로 확인할 수 있습니다.
The Core Data Stack: Persistent Store Types
When using Core Data most use SQLite without considering the other options. But what are the advantages and disadvantages of each of the…
medium.com
- NSInMemoryStoreType: 해당 방식은 In-Memory 방식으로서 객체 그래프 전체를 저장하는 방식입니다. 애플리케이션이 종료되거나 기기가 종료되는 경우에는 자료가 소멸됩니다.
- NSBinaryStoreType [Atomic]: 해당 방식은 원자성 (Atomic)을 지원하는 방식입니다. 최소한의 디스크 공간을 사용하며 다른 저장 방식에 비하여 가장 빠른 처리속도를 가지고 있습니다.
- NSSQLiteStoreType: 해당 방식은 원자성 (Atomic)을 지원하지 않은 방식입니다. 대규모의 데이터를 처리하는 애플리케이션에서는 일반적으로 해당 방식을 자주 사용하고 있습니다. 왜냐하면, 다른 저장 방식에 비하여 고성능을 지원하며 전체적인 객체 그래프를 메모리 상에 상주할 필요가 없기 때문입니다.
- NSXMLStoreType [Atomic]: 해당 방식은 XML 파일 형태로 저장이 되며 사람이 읽을 수 있는 방식으로 프로젝트 초기 단계에서 데이터의 디버깅 용도로서 사용이 됩니다. 처리 속도는 다른 저장 방식에 비하여 매우 느리며 매우 큰 메모리 공간을 사용합니다.
🗂 CoreData Usage
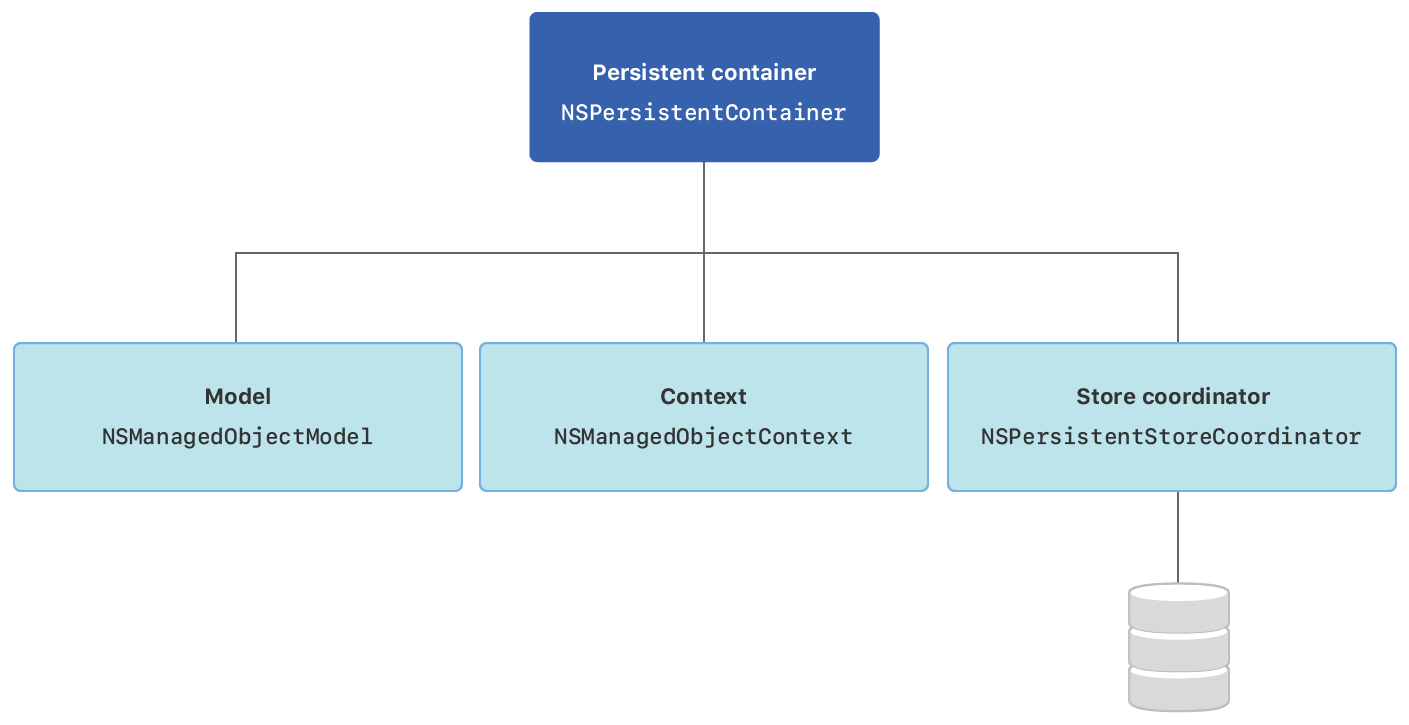
🇺🇸 Core Data Stack Overview
Core Data provides a set of classes that collaboratively support your app’s model layer:
- An instance of NSManagedObjectModel describes your app’s types, including their properties and relationships.
- An instance of NSManagedObjectContext tracks changes to instances of your app’s types.
- An instance of NSPersistentStoreCoordinator saves and fetches instances of your app’s types from stores.
- You use an NSPersistentContainer instance to set up the model, context, and store coordinator simultaneously.
🇰🇷 Core Data Stack Overview
코어 데이터는 앱 모델 계층을 지원하는 일련의 클래스를 제공합니다.
- NSManagedObjectModel 인스턴스는 관계 (Relationships) 및 속성 (Properties)을 포함하여 앱의 유형을 설명합니다.
- NSManagedObjectContext 인스턴스는 앱의 유형에 변경 사항을 추적합니다.
- NSPersistentStoreCoordinator 인스턴스는 저장소로부터 앱의 유형에 대한 인스턴스를 Save 또는 Fetch 작업을 수행합니다.
- NSPersistentContainer 인스턴스를 사용하여 Model, Context 그리고 Store Coordinator를 동시에 설정합니다.
| NAME | USE | KEY METHODS |
| NSManagedObject | - Access attributes - A "row" of data |
- entity - valueForKey: - setValue:forKey: |
| NSManagedObjectContext |
- Actions - Changes |
- executeFetchRequest:error: - save |
| NSManagedObjectModel |
- Structure - Storage |
- entities - fetchRequestTemplateForName: - setFetchRequestTemplate: forName: |
| NSFetchRequest |
- Request data | - setEntity: - setPredicate: - setFetchBatchSize: |
| NSPersistentStoreCoordinator |
- Mediator - Persisting the data |
- addPersistentStoreWithType: configuration:URL: options:error: - persistentStoreForURL: |
| NSPredicate | - Specify query | - predicateWithFormat: - evaluateWithObject: |
🗂 CoreData Save() Soruce Code with Swift
func save() -> Bool {
        // UIApplication.shared.delegate를 통하여 AppDelegate Instanse를 가져옵니다.
        guard let appDelegate = UIApplication.shared.delegate as? AppDelegate else {
            assert(false, "[ERROR] Could't get AppDelegate.")
            return false
        }

        let managedContext = appDelegate.persistentContainer.viewContext

        guard let entity = NSEntityDescription.entity(forEntityName: "Product",
                                                      in: managedContext) else {
            assert(false, "[ERROR] Could't create CoreData Entity.")
            return false
        }

        // NSManagedObject 함수는 이전에 생성 한 Entity를 통하여 CoreData Model Object를 생성하여 값을 저장합니다.
        let product = NSManagedObject(entity: entity, insertInto: managedContext)
        product.setValue(Date(), forKey: #keyPath(Product.createDate))
        product.setValue(UUID().uuidString, forKey: #keyPath(Product.serialKey))

        do {
            // Note: save can throw an error, which is why you call it using the try keyword within a do-catch block.
            try managedContext.save()
        } catch let error as NSError {
            assert(false, error.localizedDescription)
            return false
        }

        return true
    }
🗂 CoreData Fetch() Soruce Code with Swift
기본적인 결과값을 조회할 때에는 NSPredicate를 사용할 필요가 없지만 특정 조건에 맞는 데이터를 찾고자 하는 경우에는 NSPredicate를 통하여 결과를 추출하여야 합니다. NSPredicate 관련된 내용은 아래의 링크를 확인하여주세요.
NSPredicate Cheatsheet
A handy guide to using NSPredicates
academy.realm.io
func fetch() -> Array<NSManagedObject> {
        // UIApplication.shared.delegate를 통하여 AppDelegate Instanse를 가져옵니다.
        guard let appDelegate = UIApplication.shared.delegate as? AppDelegate else {
            assert(false, "[ERROR] Could't get AppDelegate.")
            return Array.init()
        }

        let managedContext = appDelegate.persistentContainer.viewContext

        // Fetch 작업을 수행하기 전 CoreData 저장 된 데이터를 불러 올 NSFetchRequest 객체를 생성합니다.
        let fetchRequest = NSFetchRequest<NSManagedObject>(entityName: "Product")

        do {
            // Returns an array of objects that meet the criteria specified by a given fetch request.
            let result = try managedContext.fetch(fetchRequest)
            return result
        } catch let error as NSError {
            assert(false, error.localizedDescription)
            return Array.init()
        }
    }
🗂 CoreData Update() Soruce Code with Swift
func update(predicateFormat: String, predicateArg: String, value: String) -> Bool {
        // UIApplication.shared.delegate를 통하여 AppDelegate Instanse를 가져옵니다.
        guard let appDelegate = UIApplication.shared.delegate as? AppDelegate else {
            assert(false, "[ERROR] Could't get AppDelegate.")
            return false
        }

        let managedContext = appDelegate.persistentContainer.viewContext

        let fetchRequest = NSFetchRequest<NSFetchRequestResult>(entityName: "Product")
        fetchRequest.predicate = NSPredicate(format: predicateFormat, predicateArg)

        do {
            let result = try managedContext.fetch(fetchRequest)

            // Check Fetch Result
            guard result.count != Int.zero else { return false }

            for item in result {
                let product = item as? NSManagedObject
                product?.setValue(value, forKey: #keyPath(Product.serialKey))
            }

            try managedContext.save()
        } catch let error as NSError {
            assert(false, error.localizedDescription)
            return false
        }

        return true
    }
🚀 REFERENCE
Core Data - Wikipedia
Core Data is an object graph and persistence framework provided by Apple in the macOS and iOS operating systems. It was introduced in Mac OS X 10.4 Tiger and iOS with iPhone SDK 3.0.[1] It allows data organized by the relational entity–attribute model to
en.wikipedia.org
Getting Started with Core Data Tutorial
Learn the basics of building the data layer of your iOS app in this getting started with Core Data tutorial!
www.raywenderlich.com
What are some advantages of using Core Data? (as opposed to plist)
I am relatively new to iOS and programming, and I made an app before, but it used a plist for storage, which I saved to the documents folder. Now, I am thinking about switching over to Core Data, b...
stackoverflow.com
'# 애플 [Apple] > iOS' 카테고리의 다른 글
| [iOS] 프로퍼티 리스트 (Property List) (0) | 2021.10.28 |
|---|---|
| [iOS] UIViewController 생명주기 (Life Cycle) (0) | 2021.10.24 |
| [iOS] Swift C/C++ Language Type (C/C++ Interoperability) (0) | 2020.07.18 |
| [iOS] UTC 날짜 및 다양한 날짜 포멧 (UTC Date and Time in Various Formats) (0) | 2020.07.11 |
| [iOS] Swift 고차 함수 (Higher-order function) (0) | 2020.06.05 |


댓글