
📣 Android NDK (Native Development Kit)
-
NDK(Native Development Kit)는 Android에서 C 및 C++ 코드를 사용할 수 있게 해주는 일련의 도구 모음으로, 네이티브 액티비티를 관리하고 센서 및 터치 입력과 같은 물리적 기기 구성요소에 액세스하는 데 사용할 수 있는 플랫폼 라이브러리를 제공합니다.
-
Android 스튜디오 2.2 이상을 사용하면 C 및 C++ 코드를 네이티브 라이브러리로 컴파일하고 IDE의 내장 빌드 시스템인 Gradle을 사용하여 APK로 패키징할 때 NDK를 이용할 수 있습니다.
-
Android 스튜디오에서 네이티브 라이브러리를 컴파일하는 기본 빌드 도구는 CMake입니다.
💡 Android NDK (Native Development Kit) TIP
-
JNI는 Java Native Interface의 약어입니다. Android가 Java 또는 Kotlin 프로그래밍 언어로 작성된 관리 코드에서 컴파일하는 바이트코드가 C/C++로 작성된 네이티브 코드와 상호 작용할 수 있는 방법을 정의합니다. JNI는 공급업체 중립적이고, 동적 공유 라이브러리에서 코드를 로드할 수 있도록 지원합니다.
-
Java 프로그래밍 언어는 UTF-16을 사용합니다. 편의상, JNI는 Modified UTF-8에서도 작동하는 메서드를 제공합니다.
📄 JNI (Java Native Interface) Data Type
/* Primitive types that match up with Java equivalents. */
typedef uint8_t  jboolean; /* unsigned 8 bits */
typedef int8_t   jbyte;    /* signed 8 bits */
typedef uint16_t jchar;    /* unsigned 16 bits */
typedef int16_t  jshort;   /* signed 16 bits */
typedef int32_t  jint;     /* signed 32 bits */
typedef int64_t  jlong;    /* signed 64 bits */
typedef float    jfloat;   /* 32-bit IEEE 754 */
typedef double   jdouble;  /* 64-bit IEEE 754 */
🔨 Android NDK (Native Development Kit) Installation
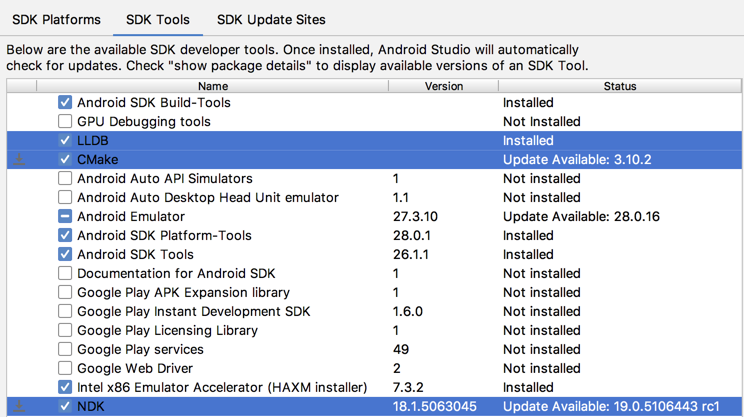
| 📷 NDK Installation Image 001 | 📷 NDK Installation Image 002 |
|---|---|
 |
 |
-
열려 있는 프로젝트의 기본 메뉴에서 Tools > Android > SDK Manager를 선택합니다.
-
SDK Tools 탭을 클릭합니다.
-
그림에서와 같이 LLDB, CMake, NDK 옆에 있는 체크박스를 선택합니다.
-
Apply를 클릭한 후 다음 대화상자에서 OK를 클릭합니다.
-
설치가 완료되면 Finish와 OK를 차례로 클릭합니다.
🔨 How To Use Android NDK (Native Development Kit)
- Java 파일 내에서 표준 System.loadLibrary를 사용하여 공유 라이브러리에서 C++ 코드를 불러옵니다.
📄 Android NDK (Native Development Kit) Source Code 001
    // Used to load the 'Here NDK File Name' library on application startup.
    static {
        System.loadLibrary("Here NDK File Name");
}- C++ Native File 내에 정의 된 Method를 사용할 수 있도록 Java 파일 내에 선언합니다.
[Access Modifier] native [Return Type] Method Name (Parameters)의 형식으로 정의합니다.

📄 Android NDK (Native Development Kit) Source Code 002
      /*
      * A native method that is implemented by the 'Here NDK File Name' native library,
      * which is packaged with this application.
      */

    public native String stringFromJNI();
    public native double doubleFromJNI();
public native int addTargetFromJNI(int left, int right);- C++ Native File을 열어서
#include <jni.h>선언하고extern "C" JNIEXPORT [JNI RETURN TYPE] JNICALL을 함수 정의 위에 작성합니다. 이후Java_[ANDROID_PACKGE_PATH]_[ACTIVITY_NAME]_[METHOD NAME](JNIEnv * env, jobject instance, [OPTIONAL])의 형태로 함수를 정의합니다.

📄 Android NDK (Native Development Kit) Source Code 003
#include <jni.h>
#include <string>
#include <iostream>

extern "C" JNIEXPORT jstring JNICALL
Java_com_example_myapplication_MainActivity_stringFromJNI(JNIEnv * env, jobject instance) {
    // MARK: JNIEnv*는 VM을 가리키는 포인터이고 jobject는 자바 측으로부터 전달된 암시적 this 객체를 가리키는 포인터입니다.
    std::string hello = "Hello from C++";
    return env->NewStringUTF(hello.c_str());
} extern "C"

JNIEXPORT jdouble JNICALL
Java_com_example_myapplication_MainActivity_doubleFromJNI(JNIEnv *env, jobject instance) {
    return 3.14;
} extern "C"

JNIEXPORT jint JNICALL
Java_com_example_myapplication_MainActivity_addTargetFromJNI(JNIEnv *env,  jobject instance, jint left, jint right) {
    return left + right;
} extern "C";
📣 REFERENCE
'#모바일 [Mobile] > Android' 카테고리의 다른 글
| [Android] Android Studio Assets Folder 만들기 (0) | 2019.06.27 |
|---|---|
| [Android] 브로드캐스트 리시버 (Broadcast Receiver) (0) | 2019.06.26 |
| [Android] Service (0) | 2019.06.25 |
| [Android] 연락처 제공자 (Contact Provider) (0) | 2019.06.24 |
| [Android] Android API (Application Programming Interface) Level (0) | 2019.06.24 |


댓글